專注Java教育14年
全國咨詢/投訴熱線:400-8080-105
更新時間:2022-06-28 10:16:46 來源:動力節點 瀏覽1417次
我們來看看SpringBoot啟動的全過程。
@SpringBootApplication
public class CmsApplication {
 public static void main(String[] args) {
  SpringApplication.run(CmsApplication.class, args);
 }
}
SpringBoot 應用注解是@Configuration、@Enable AutoConfiguration 和@ComponentScan 注解的集成。它們代表Spring bean的配置bean,開啟自動配置spring的上下文,組件掃描的路徑。這就是為什么 * 應用程序。Java需要放在根路徑下,所以@ComponentScan掃描就是整個項目。
其次,啟動類默認只有一個main方法,調用SpringApplication。運行方法。讓我們看一下 SpringApplication 類。
public static ConfigurableApplicationContext run(Object source, String... args) {
  return run(new Object[]{source}, args);
 }
...
public static ConfigurableApplicationContext run(Object[] sources, String[] args) {
  Return (new Spring Application (sources). run (args); //sources is the specific CmsApplication. class class class class
 }
...
通過提取兩個直接調用的run方法,可以看到靜態方法SpringApplication。run 最后創建一個 SpringApplication 并在其中運行 run 方法。
查看構造方法:
public SpringApplication(Object... sources) {
  this.bannerMode = Mode.CONSOLE;
  this.logStartupInfo = true;
  this.addCommandLineProperties = true;
  this.headless = true;
  this.registerShutdownHook = true;
  this.additionalProfiles = new HashSet();
  this.initialize(sources);
 }
...
設置基值后調用initialize方法初始化構造函數,如下:
private void initialize(Object[] sources) {
  if (sources != null && sources.length > 0) {
   this.sources.addAll(Arrays.asList(sources));
  }
  this.webEnvironment = this.deduceWebEnvironment();
  this.setInitializers(this.getSpringFactoriesInstances(ApplicationContextInitializer.class));
  this.setListeners(this.getSpringFactoriesInstances(ApplicationListener.class));
  this.mainApplicationClass = this.deduceMainApplicationClass();
 }
...
(1)將source放在SpringApplication的source屬性中,source是一個LinkedHashSet(),也就是說我們可以同時創建多個自定義的非重復應用,但是目前只有一個。
(2)判斷是否為web程序(?javax.servlet.Servlet且org.springframework.web.context.ConfigurableWebApplicationContextAll必須存在于類加載器中并設置為webEnvironmentAttribute.
(3)從spring中找到Application Context Initializer。工廠并將其設置為初始化程序。
(4)從spring中找到Application Listener。工廠并將其實例化為 Spring Application 的 listener listeners 屬性。這個過程是找到所有的應用程序事件監聽器。
(5)找出主方法類(這里是CmsApplication),返回Class對象。
默認情況下,initialize 方法從 spring 中查找鍵為 ApplicationContextInitializer 的類。工廠文件:
org.springframework.boot.context.config.DelegatingApplicationContextInitializer
org.springframework.boot.context.ContextIdApplicationContextInitializer
org.springframework.boot.context.ConfigurationWarningsApplicationContextInitializer
org.springframework.boot.context.web.ServerPortInfoApplicationContextInitializer
org.springframework.boot.autoconfigure.logging.AutoConfigurationReportLoggingInitializer
關鍵是ApplicationListener。
org.springframework.boot.context.config.ConfigFileApplicationListener
org.springframework.boot.context.config.AnsiOutputApplicationListener
org.springframework.boot.logging.LoggingApplicationListener
org.springframework.boot.logging.ClasspathLoggingApplicationListener
org.springframework.boot.autoconfigure.BackgroundPreinitializer
org.springframework.boot.context.config.DelegatingApplicationListener
org.springframework.boot.builder.ParentContextCloserApplicationListener
org.springframework.boot.context.FileEncodingApplicationListener
org.springframework.boot.liquibase.LiquibaseServiceLocatorApplicationListener
public ConfigurableApplicationContext run(String... args) {
  StopWatch stopWatch = new StopWatch ();// Construct a Task Execution Observer
  StopWatch. start ();// Start execution, record start time
  ConfigurableApplicationContext context = null;
  FailureAnalyzers analyzers = null;
  this.configureHeadlessProperty();
  // Get Spring Application RunListeners with only one Event Publishing RunListener inside
  SpringApplicationRunListeners listeners = this.getRunListeners(args);
  // Encapsulate Spring Application Event events and broadcast them to listeners in Spring Application to start listening
  listeners.starting();
  try {
   // Construct an application parameter holder class
   ApplicationArguments applicationArguments = new DefaultApplicationArguments(args);
   // Load Configuration Environment
   ConfigurableEnvironment environment = this.prepareEnvironment(listeners, applicationArguments);
   Banner printedBanner = this.printBanner(environment);
   // Create Spring containers (using BeanUtils. instantiate)
   context = this.createApplicationContext();
   // If container creation fails, analyze the cause of output failure
   new FailureAnalyzers(context);
   // Setting up container configuration environment, monitoring, etc.
   this.prepareContext(context, environment, listeners, applicationArguments, printedBanner);
   // Refresh containers
   this.refreshContext(context);
   this.afterRefresh(context, applicationArguments);
   // Broadcast the Application ReadyEvent event to the corresponding listener for execution
   listeners.finished(context, (Throwable)null);
   StopWatch. stop ();// End of execution, record execution time
   if (this.logStartupInfo) {
    (new StartupInfoLogger(this.mainApplicationClass)).logStarted(this.getApplicationLog(), stopWatch);
   }
   Return context; // Return Spring container
  } catch (Throwable var9) {
   this.handleRunFailure(context, listeners, (FailureAnalyzers)analyzers, var9);
   throw new IllegalStateException(var9);
  }
 }
run方法的流程分析如下。該方法的幾個關鍵步驟如下:
(1)創建應用監聽Spring Application RunListeners并開始監聽
(2)加載SpringBook可配置環境。如果通過 Web 容器發布,它會加載標準環境,最終繼承可配置環境。類圖如下。
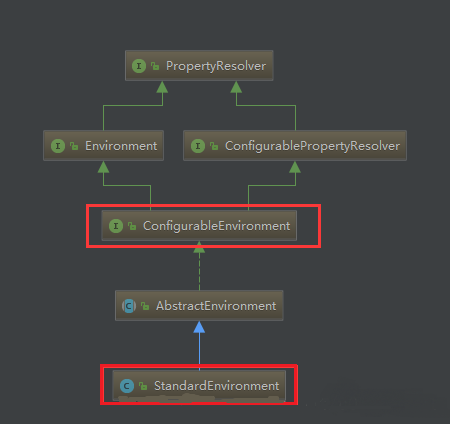
可以看到,*Environment最終實現了PropertyResolver接口,而我們通常在通過環境對象獲取配置文件中Key對應的value方法時,會調用PropertyResolver接口的getProperty方法。
(3)配置環境添加到監聽器對象(Spring Application RunListeners)
(4)創建Spring Container:可配置應用上下文(Application Configuration Context),我們可以看看創建方法
protected ConfigurableApplicationContext createApplicationContext() {
  Class<?> contextClass = this.applicationContextClass;
  if (contextClass == null) {
   try {
    contextClass = Class.forName(this.webEnvironment ? "org.springframework.boot.context.embedded.AnnotationConfigEmbeddedWebApplicationContext" : "org.springframework.context.annotation.AnnotationConfigApplicationContext");
   } catch (ClassNotFoundException var3) {
    throw new IllegalStateException("Unable create a default ApplicationContext, please specify an ApplicationContextClass", var3);
   }
  }
  return (ConfigurableApplicationContext)BeanUtils.instantiate(contextClass);
 }
該方法首先獲取顯式設置的應用上下文類,如果不存在,則加載默認環境配置(通過判斷是否為web環境),默認Annotation Config應用上下文注解上下文(通過掃描所有注解類加載bean) ,最后通過BeanUtils實例化上下文對象,并返回,Configurab。leApplicationContext類圖如下
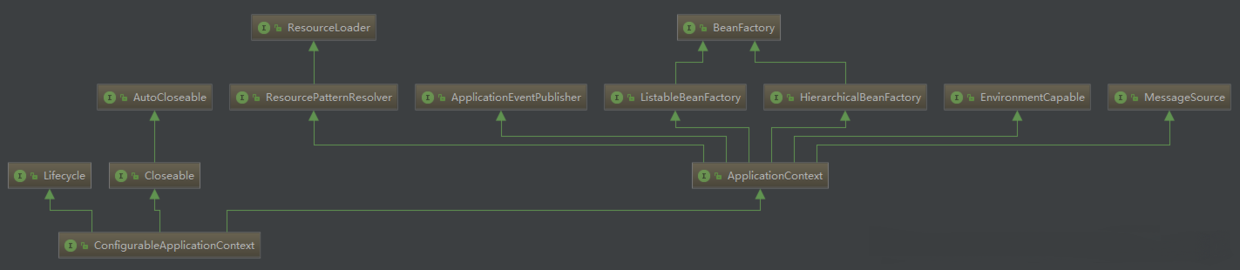
主要取決于其繼承的兩個方向:
LifeCycle:生命周期類,定義了start start、stop、isRunning是否運行一個中等生命周期的空值方法
ApplicationContext:應用上下文類,主要繼承beanFactory類。
(5)回到run方法,設置容器prepareContext方法,將監聽器、環境、應用Arguments、banner等重要組件與上下文對象關聯起來。
(6)刷新容器。refresh()方法:初始化方法如下:
public void refresh() throws BeansException, IllegalStateException {
  Object var1 = this.startupShutdownMonitor;
  synchronized(this.startupShutdownMonitor) {
   this.prepareRefresh();
   ConfigurableListableBeanFactory beanFactory = this.obtainFreshBeanFactory();
   this.prepareBeanFactory(beanFactory);
   try {
    this.postProcessBeanFactory(beanFactory);
    this.invokeBeanFactoryPostProcessors(beanFactory);
    this.registerBeanPostProcessors(beanFactory);
    this.initMessageSource();
    this.initApplicationEventMulticaster();
    this.onRefresh();
    this.registerListeners();
    this.finishBeanFactoryInitialization(beanFactory);
    this.finishRefresh();
   } catch (BeansException var9) {
    if (this.logger.isWarnEnabled()) {
     this.logger.warn("Exception encountered during context initialization - cancelling refresh attempt: " + var9);
    }
    this.destroyBeans();
    this.cancelRefresh(var9);
    throw var9;
   } finally {
    this.resetCommonCaches();
   }
  }
 }
refresh()Method做了很多核心工作,比如設置BeanFactory,執行BeanFactory PostProcessor接口,執行BeanFactory Processor接口,解析自動化配置類,加載spring。工廠,實例化bean,解析條件注釋,國際化初始化等等。這部分將在以后的文章中分析。
(7)廣播Application ReadyEvent并在執行結束時返回Configurable Application Context。
至此,SpringBoot啟動完成,回顧一下整體流程,Springboot啟動,主要創建配置環境(environment),監聽器,應用上下文,根據以上條件,我們開始實例化我們需要的bean容器。如果大家想了解更多相關知識,可以關注一下動力節點的Spring框架教程,里面有更豐富的知識等著大家去學習,希望對大家能夠有所幫助。
 Java實驗班
0基礎 0學費 15天面授
 Java就業班
有基礎 直達就業
 Java夜校直播班
業余時間 高薪轉行
 Java在職加薪班
工作1~3年,加薪神器
 Java架構師班
工作3~5年,晉升架構
提交申請后,顧問老師會電話與您溝通安排學習


官方微信

官方抖音


 京公網安備 11030102010736號